By default, the new fax is created on behalf of the current user who is logged in. This chapter explains how to send a fax using a different fax account. For example, this can be useful when several users want to share single fax account and have access to outgoing faxes created by any of these users.
To send a fax from Windows Fax and Scan
1. Run Windows Fax and Scan under a different user account, see To access faxes created by another user.
2. Click the New Fax button on the toolbar to open the New Fax dialog box.
3. On the New Fax page, enter the recipient fax number in the To box.
4. Optionally select a Cover Page.
5. Optionally, enter the appropriate information in the Subject and Cover page notes boxes.
6. Optionally, configure sender information.
7. You can attach a document to the fax message with the Attach button on the New Fax toolbar, insert a picture in the body of the fax with the Insert Picture button, and insert a scanned item with the Insert From Scanner button.
8. Click Send to send a fax.
To Send a Fax from a Windows application
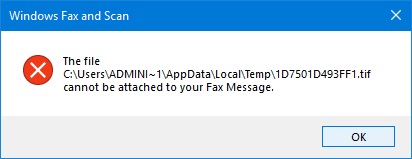
The Windows Fax and Scan application should be started under a different user account, see To access faxes created by another user. The procedure is the same as described in the Send a Fax from a Windows application chapter, however by default, when printing to the Fax printer, you will receive an error as shown in the figure below.

As a workaround, you should grant read access to the current user's temp folder for the user account under which the Windows Fax and Scan is running. To grant access rights, follow these steps:
1. In Windows Explorer, navigate to the folder that contains the current user's temporary folder. The temporary folder (%temp%) for the current user account is usually C:\Users\<Account Name>\AppData\Local\Temp\.
2. Right-click the Temp folder, and then select Properties. In the Temp Properties window switch to Security page. Click Edit... .
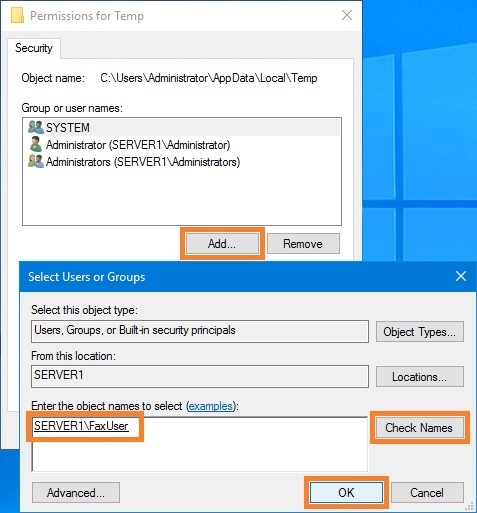
3. In the Permissions for Temp window, in the Group or user names list, make sure there is an entry associated with the user account under which the Windows Fax and Scan is running. If the entry does not exist, click Add, type user accounts name, click Check Names, click OK.

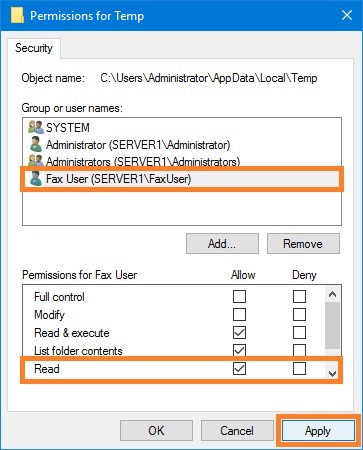
4. In the Permissions for Temp window, in the Group or user names list, select the entry associated with the user account under which the Windows Fax and Scan is running. Grant Read access permissions for this account, as shown in the picture below. Click Apply.

To send a fax, follow these steps:
1. Make sure that Windows Fax and Scan application is already started under the desired user account, see To access faxes created by another user. Do not close the Windows Fax and Scan main window.
2. Follow the instructions in the Send a Fax from a Windows application chapter.
The new fax job will be created under the user account that is running Windows Fax and Scan, not under the current user account.